In this article, we are going to look at how to use SQLite RDBMS in Unity 3D. After this article, you’ll be able to use SQLite in your Unity projects.
A little knowledge of SQL is recommended in the article (you can learn the basics from here), with this also important to know the basic concepts of C#.
Quick Introduction to SQLite
SQLite is a fast, open-source, portable, compact SQL database engine. It is written in the C programming language.
SQLite is built into most mobile phones and computers, and most computers and mobile applications use SQLite for managing databases.
SQLite databases are written on files. It is an adequate RDBMS for small projects to be built in Unity.
Creating Example Game
In this section, we will create an example game for using SQLite in Unity. The only goal of the game will be to move the character.
The player’s location information will be saved when the Q key is pressed and will be loaded when the E key is pressed.
No assets will be used for the character. Since the main subject is coding, there is no introduction to the design.
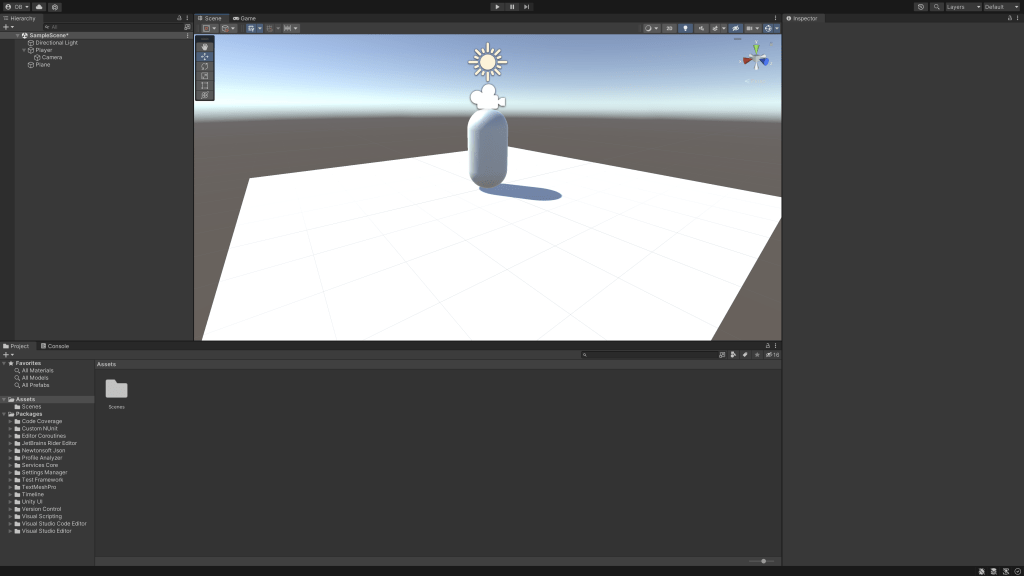
We start by adding a plain object and capsule to the stage. Afterward, we delete the primary camera and create a new one on the capsule.
Thus, we have ground and player with the first-person camera. Then, we can create a movement script for the character.
using System.Collections;
using System.Collections.Generic;
using UnityEngine;

public class Movement : MonoBehaviour
{
    [SerializeField]
    private Rigidbody rb;
    private float xAxis, zAxis;

    // Start is called before the first frame update
    void Start()
    {
        rb.GetComponent<Rigidbody>();
    }

    // Update is called once per frame
    void Update()
    {
        xAxis = Input.GetAxis("Horizontal");
        zAxis = Input.GetAxis("Vertical");
    }

    void FixedUpdate()
    {
        rb.velocity = new Vector3(xAxis, rb.velocity.y, zAxis);
    }
}
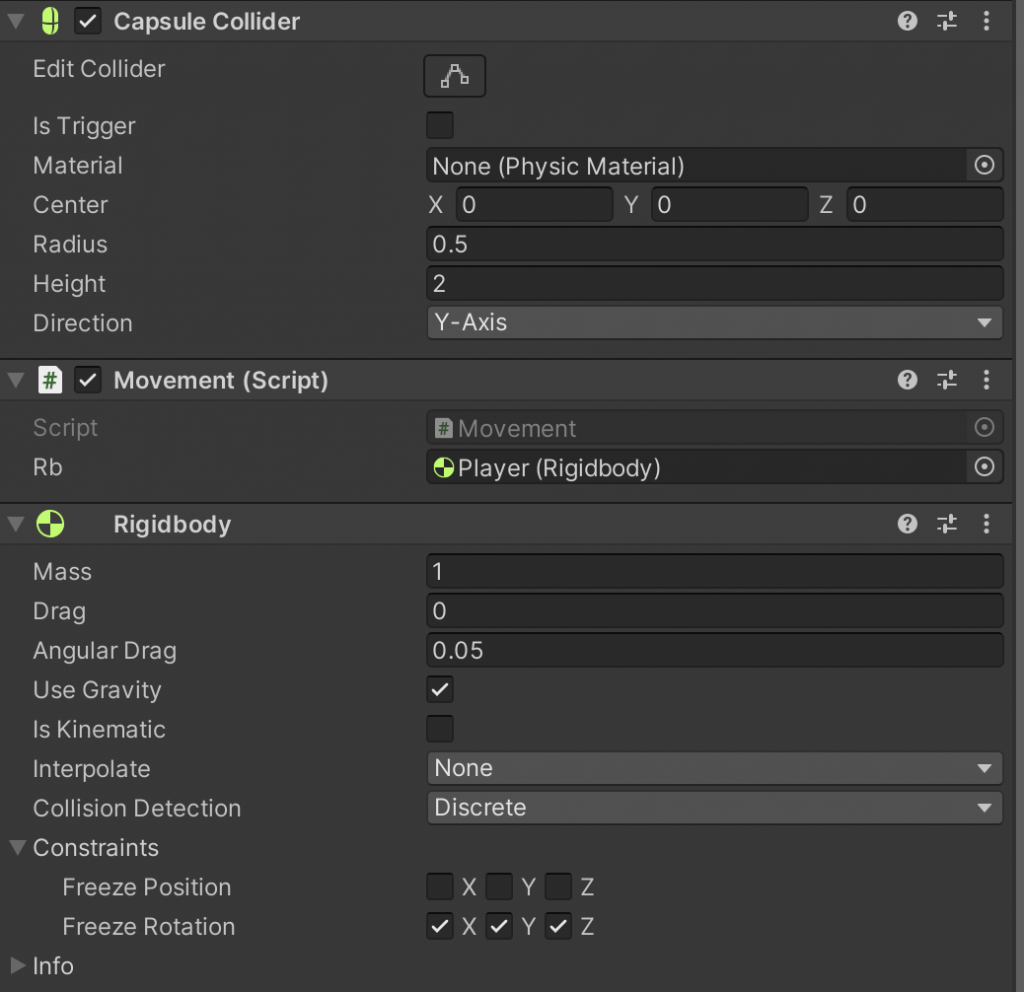
Now our capsule can perform its movement in X and Z coordinates, we will not add any jumps.
Setup SQLite For Unity in macOS & Windows
To use SQLite in Unity. We need 2 components. In this section, we will install the requirements.
Setup SQLite in MacOS
Go to the official SQLite download page from the link here and choose a precompiled binaries for windows (it sounds weird but it will work).
First of all, create a new folder under the assets folder and rename it Plugins. After that, create another folder and rename it StreamingAssets.
After creation, you have to move sqlite3.def and sqlite3.dll files into your Plugins folder in Unity.
Then, get Mono.Data.Sqlite.dll from 2021.3.6f1 > Unity > Contents > MonoBleedingEdge > lib > mono > unityjit folder and add it to Plugins.

Now, we are ready for creating a database. Before creating a new database we install DB Browser for SQLite (click here for the official website).
This application allows you to easily create and manage the SQLite database. I recommend using this application to manage databases.
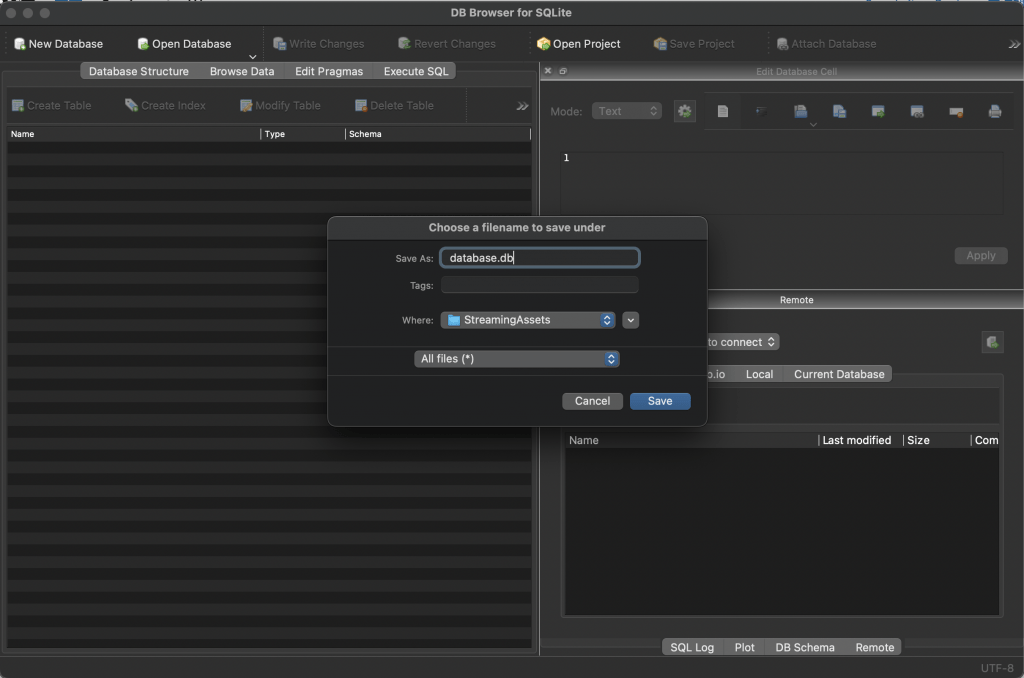
Name the database and choose the location where the database will be created as the StreamingAssets folder.
After creating the database, we create a table to hold the data. You can specify its name as Coordinates.
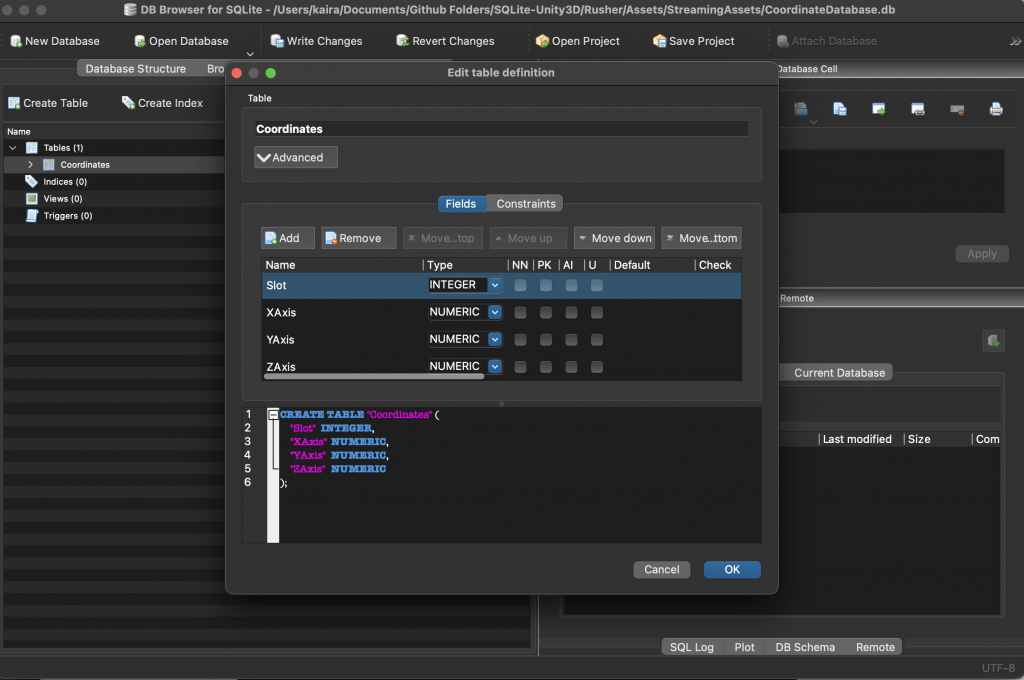
I add three columns to the table, these columns will hold values of NUMERIC data type (decimal type).
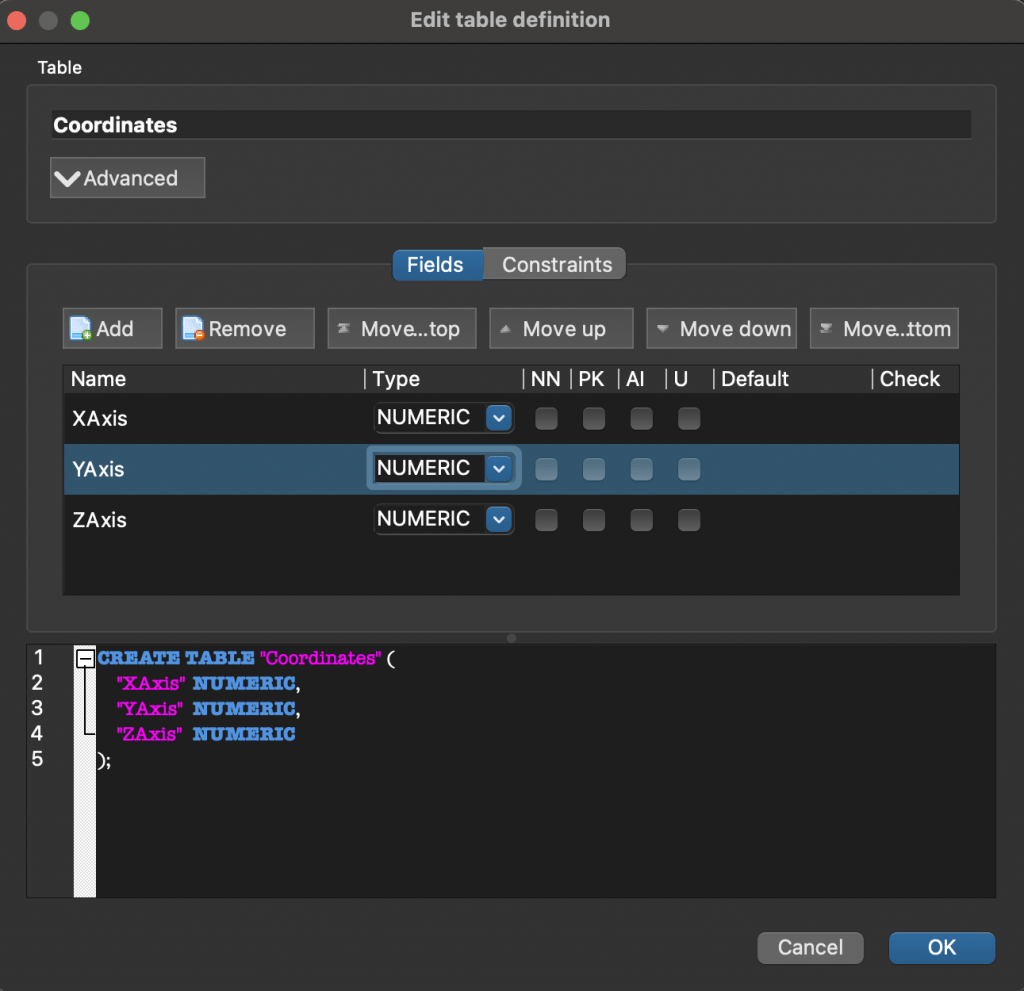
You can switch to the Browse data section to view the table. We have successfully set up the requirements and database on macOS.
If you are an M1 – M2 or any new generation chip user, don’t worry, the same steps apply to you (tried on an M1 computer).
Setup SQLite in Windows
The Windows installation and the macOS installation are almost the same, in this section, I will show you a few different steps that you need to do.
Select the precompiled binaries for Windows from the SQLite official site and put the files in the Plugins folder (see the macOS section for detailed information).
The Mono.Data.SQLite.dll file is stored elsewhere in Windows, navigate to the folder below and copy and drag the file to Plugins.
C:\Program\Files\Unity\Hub\Editor\2021.3.6f1\Editor\Data\MonoBleedingEdge\lib\mono\unity (It may change according to the version, check the file path).
That’s done, complete the DB Browser installation and create a database as mentioned in the MacOS section.
Saving Position Coordinates
Now that we have completed the series of long installations, we can now return to the project, in this section we will save the position of the character in SQLite.
We will save the character’s position each time the player presses the Q key (UI element can also be added).
using UnityEngine;
using System.Data;
using Mono.Data.Sqlite; // For using SQLite

public class DatabaseManager : MonoBehaviour
{
    // Player transform for access position
    [SerializeField]
    private Transform playerTransform;

    void Update()
    {
        // When pressed Q
        if (Input.GetKeyDown(KeyCode.Q))
        {
            // Connect Database
            IDbConnection connection = ConnectDatabase("CoordinateDatabase");
            // Insert position values into table
            PushCommand(string.Format("INSERT INTO Coordinates (XAxis,YAxis,ZAxis) VALUES({0},{1},{2});", playerTransform.position.x, playerTransform.position.y ,playerTransform.position.z), connection);
            // Close database
            connection.Close();
        }
    }

    // Connect database with database file name
    IDbConnection ConnectDatabase(string dbName)
    {
        // Search database file
        IDbConnection connection = new SqliteConnection(string.Format("URI=file:Assets/StreamingAssets/{0}.db", dbName));
        // Open database
        connection.Open();
        // Return database connection for using in another function
        return connection;
    }

    // Create new command on opened database
    void PushCommand(string commandString, IDbConnection connection)
    {
        // Create new command
        IDbCommand command = connection.CreateCommand();
        // Add your comment text (queries)
        command.CommandText = string.Format("{0}", commandString);
        // Execute command reader - execute command
        command.ExecuteReader();
    }
}
With the help of this script, we can save the position of the character in the table named coordinates every time the Q key is pressed.
For those unfamiliar with SQL, let me tell you a little about how the query works.
The INSERT INTO query specifies that data will be sent to a table. The data to be sent is written into VALUES.
“INSERT INTO Coordinates (XAxis,YAxis,ZAxis) VALUES({0},{1},{2});” This query inserts a new row to the X, Y, and Z columns.
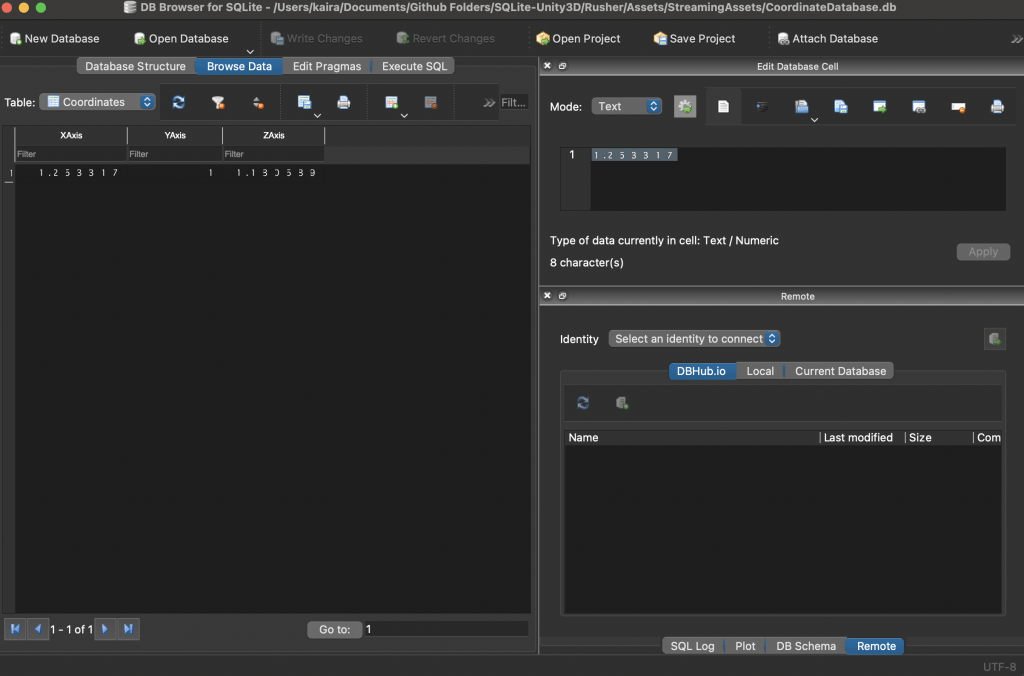
Here is the view of the data loaded into the table when you press the Q key. You can try to save again and again.
Reading Coordinates From SQLite
It is not enough to save this data, we will need it later. Next is how to get data from the table.
In this section, we are going to read the saved position with C#. We will set it to return to the last saved position when the player presses the E key.
Before we start preparing the code, we need to add a new column to the table, this column will be the “Slot” column.
The slot column is like an ID that will determine which saved data we pull. It specifies which row to pull, similar to indexing.
using UnityEngine;
using System.Data;
using Mono.Data.Sqlite; // For using SQLite

public class DatabaseManager : MonoBehaviour
{
    // Player transform for access position
    [SerializeField]
    private Transform playerTransform;
    // Database name
    private string dbName = "CoordinateDatabase";
    // Database Connection
    IDbConnection connection;

    private void Start()
    {
        // Connect Database
        connection = new SqliteConnection(string.Format("URI=file:Assets/StreamingAssets/{0}.db", dbName));
    }

    void Update()
    {
        // When pressed Q
        if (Input.GetKeyDown(KeyCode.Q))
        {
            // Open database
            connection.Open();
            // Update Data in Save Slot
            PushCommand(string.Format("UPDATE Coordinates SET XAxis = {0}, YAxis = {1} , ZAxis = {2} WHERE Slot = 1;", playerTransform.position.x, playerTransform.position.y, playerTransform.position.z), connection);
        }

        // When pressed E
        if (Input.GetKeyDown(KeyCode.E))
        {
            // Open database
            connection.Open();

            // Read X , Y , Z Axis
            IDataReader dataReader = ReadSavedData();

            // Separate Float Data and assign to player position
            while (dataReader.Read())
            {
                // Assigning saved position
                playerTransform.position = new Vector3(dataReader.GetFloat(1), dataReader.GetFloat(2), dataReader.GetFloat(3));
            }
        }

        // Close database
        connection.Close();
    }

    // Create new command on opened database
    void PushCommand(string commandString, IDbConnection connection)
    {
        // Create new command
        IDbCommand command = connection.CreateCommand();
        // Add your comment text (queries)
        command.CommandText = string.Format("{0}", commandString);
        // Execute command reader - execute command
        command.ExecuteReader();
    }

    // Read last position from coordinates table
    IDataReader ReadSavedData()
    {
        // Create command (query)
        IDbCommand command = connection.CreateCommand();
        // Get all data in Slot = 1 from coordinates table
        command.CommandText = "SELECT * FROM Coordinates WHERE Slot = 1;";
        // Execute command
        IDataReader dataReader = command.ExecuteReader();
        return dataReader;
    }
}
With the help of the UPDATE query, we are now updating the row with the Slot number instead of adding new data.
You can open 5-10 different slots and then store different data with the same data type on these slots. The WHERE query selects which slot the data will be saved in.
“SELECT * FROM Coordinates WHERE Slot = 1” this query allows us to pull the whole row where the Slot is 1 in the coordinates table.
“UPDATE Coordinates SET XAxis = {0}, YAxis = {1} , ZAxis = {2} WHERE Slot = 1;” this query updates the data in slot 1 according to the x, y, and z values of the player.
Conclusion
In this article, we learned how to use SQLite in Unity3D. Small games and small projects (indie games also) can use SQLite database.
You can access and download the entire project folder from my Github account, most of the functions are reusable so you can use these in your projects.

Hello
Have you ever used the prepare statement for Macos, I’d like to use it but can not find something related to it in google
I got this site from my pal who told me about this web site and at the moment this time I am browsing this web page and reading
very informative posts at this time.
Hi to every single one, it’s truly a nice for me to pay a visit this
website, it consists of important Information.