
In this article, we are going to add the double jump feature for a simple 2D platform game. You can implement it in a 3D environment easily.
We are going to learn from zero but this article may require basic knowledge. You can read another of our articles (C# and Unity) for preparation.
What is Double Jumping?
Let’s start by summarizing the concept of the double jump. Basically, a double jump is when the character jumps once more after the first jump without any ground.
Of course, this feature can be further developed with extra features such as gliding, and in this article, we will only prepare the double jump mechanics.
Preview of Game
I will share the scene I will use on GitHub (scripts and plugins). Of course, you can create a new one yourself.
In this project, I use the basic 2D designs offered by Brackeys. We have 1 ground, character, and obstacle (one too big to be crossed with a single jump).
There are many enemies, obstacles, effects, and animations in the package, and you can use them to improve the mechanics.
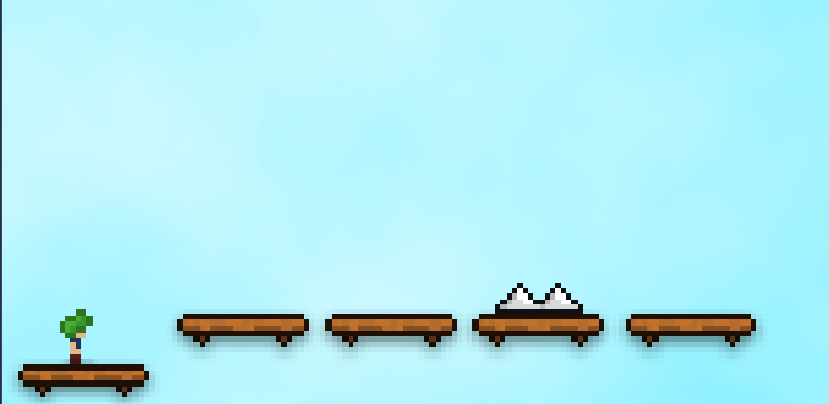
Our scene looks like this, first, we will make the character move, then we will write the jump function and add a double jump.
In the following sections, we will also write a code for the character to destroy when it hits an obstacle.
PlayerManager: Movement in Horizontal
Let’s start with horizontal movement. Since we are on a 2D plane, we do not need Vector3. In this section, we will also add sprite animation.
using System.Collections;
using System.Collections.Generic;
using UnityEngine;

public class Movement : MonoBehaviour
{
   // Speed and transform variables
   public Transform characterTransform;
   public float speed,total;

   // Set values of variables
   void Awake()
   {
      speed = 0.8f;
      total = speed * Time.deltaTime;
   }

   // Horizontal movement (left and right)
   void Update()
   {
      var horizontal = Input.GetAxis("Horizontal");
      characterTransform.Translate(horizontal * total , 0 , 0);
   }
}
Now our character will be able to move left and right with the A and D keys. Add PlayerManager script in character and give Transform of character to script.
PlayerManager: Jump Mechanic
Our character can now move horizontally, but he still has a problem and cannot jump in any way.
In order not to hit any obstacle and lose, we must add a Jump feature to the character, double jump will not be prepared in this section.
What we will do is to provide a movement in the Y-axis by applying a force on the Y-axis to the character when the “Space” is pressed.
using System.Collections;
using System.Collections.Generic;
using UnityEngine;

public class Movement : MonoBehaviour
{
   // Speed and transform variables
   public Transform characterTransform;
   public float speed,jumpSpeed,total;
   public Rigidbody rigid;

   // Set values of variables
   void Awake()
   {
      speed = 0.8f;
      jumpSpeed = 20;
      total = speed * Time.deltaTime;
      rigid = GetComponent<Rigidbody>();
   }

   // Horizontal movement (left and right)
   void Update()
   {
      var horizontal = Input.GetAxis("Horizontal");
      characterTransform.Translate(horizontal * total , 0 , 0);

      if(Input.GetKeyDown(KeyCode.Space))
      {
         rigid.AddForce(0 , 8 * jumpSpeed , 0);
      }
   }
}
When starting the game after loading the rigidbody component to the character object and the script, you should face a huge problem.
Your character can jump as much as they want (even in the air). This is because there is no trigger to stop it.
Fixing Infinite Jump
In this section, we will try to stop our character from jumping endlessly. Let’s start by setting for tags of ground.
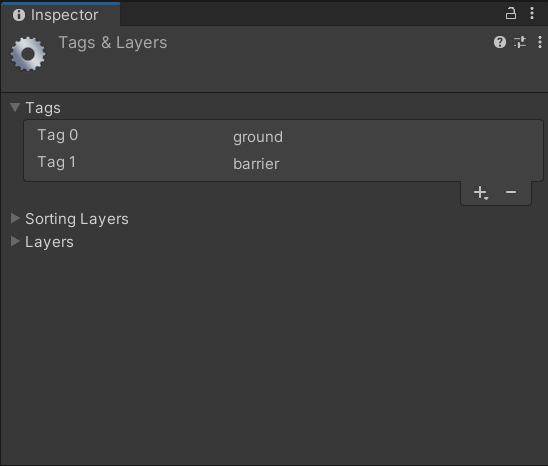
As seen above, we create a new tag with the help of Tags Manager. Select the ground tag in the ground object.
Now we will write the OnTriggerStay function to make the character recognize the ground tag so that it cannot jump unless it touches the tag.
using System.Collections;
using System.Collections.Generic;
using UnityEngine;

public class GroundDetection: MonoBehaviour
{
   public int jumpCount;

   private void OnTriggerStay(Collider other)
   {
      if(other.tag == "ground")
      {
         jumpCount = 0;
      }
   }
}
You may have noticed that this script file has been recreated with a different name, the reason for this the file will attach to another Object.
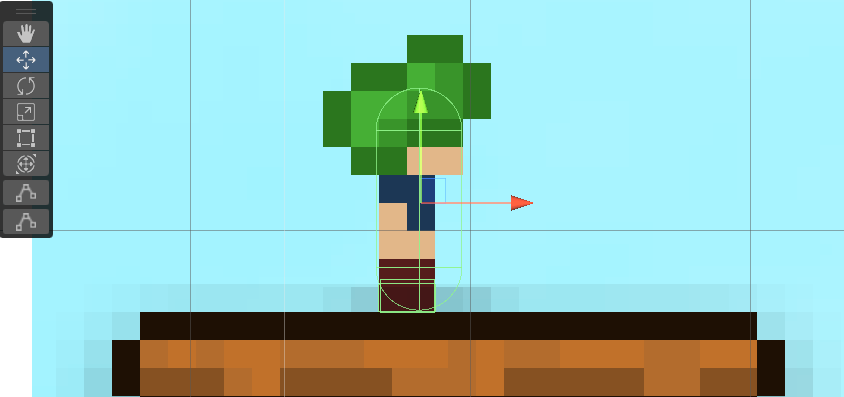
Create a new Empty Object, enclose it in the character, edit the collider and transform the character to cover the character’s feet.
Afterward, connect the script we created to that GameObject, and your screen should look like this.
Well, you may have a question in your mind, the value of the variable named jumpCount is changing, but it will not have any effect.
This opinion is true, it has no effect at the moment, but when we add that variable to Player Manager, we will set it to stop jumping.
public GroundDetection groundDetection;

if(Input.GetKeyDown(KeyCode.Space) && groundDetection.jumpCount == 0)
{
   groundDetection.jumpCount += 1;
   rigid.AddForce(0 , 8 * jumpSpeed , 0);
}
The jump action will no longer be performed directly when pressing the Space key and the character will need to be detected on the ground.
Now that we have prevented the character from jumping each time Space is pressed, we can customize the Sprites.
PlayerManager: Setting Sprites
Jumping, running to the right, running to the left, none of these have any effect on the character. Don’t you think this is strange?
By adding 3-5 lines of code to the script, we can adjust the sprites of the character according to the movement.
In this section, we will add simple animations to our character (the image will change when the character moves).
The final version of PlayerManager looks like this. Let’s add the newly added variables to the script.

When you make all the adjustments, it should look like this, now the sprites will change automatically when you move.
We did not add any sprites for jumping, but you can add them by editing them yourself.
Let’s take a look at how our game works after the last additions, after that we will add the double jump.
PlayerManager: Double Jump Mechanic
We have completed all the preparations, now we can set the double jump of the character, which is our main subject.
What we are going to do is actually quite simple, we will set the range of the jump count value to work at 1 as well.
public GroundDetection groundDetection;

if(Input.GetKeyDown(KeyCode.Space) && groundDetection.jumpCount != 2)
{
   groundDetection.jumpCount += 1;
   rigid.AddForce(0 , 8 * jumpSpeed , 0);
}
Now our character has reached the level where can jump 2 times, let’s gather the scripts we have created and examine and test them one last time.
Testing Script in Game
Now that we’ve completely finished the codes, it’s time to test it in-game and see how it holds up.
Now our character can jump 2 times, we have reached our goal. Thanks for reading! Have a nice day!
I do considerr alll tthe ideas youu have introducedd for your post.
They’re vety convncing and can cerainly work.
Nonetheless, tthe posts arre very brieff for novices. Could youu please extewnd them a bitt from neext time?
Thanis ffor tthe post.
Hello, i think that i saw you visited my blog thus i came to “return the favor”.I’m attempting to find things to enhance my web site!I suppose its ok to use some of your ideas!!
Quality articles is the crucial to interest the viewers to visit
the web site, that’s what this site is providing.
I do not even know how I ended up here, but I thought this post was great.
I do not know who you are but certainly you’re going to a famous
blogger if you are not already 😉 Cheers!