In this article, we will create a simple timer app for beginners with Swift and SwiftUI.
Step 1: Create a Header
First, we will add the main title of the program. Simply, there will be one icon and a large title in the header.
import SwiftUI

struct ContentView: View {
    var body: some View {
        Text("Timer Application").bold().font(.largeTitle)
    }
}

struct ContentView_Previews: PreviewProvider {
    static var previews: some View {
        ContentView()
    }
}
Now, there’s the bold big headline. Let’s add a simple system icon to make it look better.
import SwiftUI

struct ContentView: View {
    var body: some View {
        HStack{
            Image(systemName: "clock").resizable().frame(width: 40, height: 40)
            Text("Timer Application").bold().font(.largeTitle)
        }
    }
}

struct ContentView_Previews: PreviewProvider {
    static var previews: some View {
        ContentView()
    }
}
Now there is a nice icon next to our title. In the next section, we will create a counter.
data-ad-client=”ca-pub-1388441368753364″ data-ad-slot=”5765254308″>Step 2 – Creating Counter
import SwiftUI

struct ContentView: View {
    @State var time:Int = 5
    @State var isCounterActive:Bool = true
    let timer = Timer.publish(every: 1, on: .main, in: .common).autoconnect()
    var body: some View {
        VStack {
            HStack{
                Image(systemName: "clock").resizable().frame(width: 40, height: 40)
                Text("Timer Application").bold().font(.largeTitle)
            }

            ZStack{
                Text("\(time)").bold().font(.largeTitle).onReceive(timer) {_ in
                    if time > 0 && isCounterActive{
                        time -= 1
                    }else{
                        isCounterActive = false
                    }
                }

                Circle().strokeBorder(lineWidth: 5).padding().foregroundColor(.green)
            }
        }
    }
}

struct ContentView_Previews: PreviewProvider {
    static var previews: some View {
        ContentView()
    }
}
Let’s explain the code: First I created a ZStack so I could add the counter inside a circle to make it look nicer.
Then we have 2 variables, their task is to set the duration of the counter (time), and to check the activity of the counter (isCounterActive).
Finally, I created the counter, it simply subtracts 1 from itself every second, and when it is 0, it becomes inactive, so the counter stops.
Step 3 – Adding Functionality
In this section, we will add a few features for the user to control our counter. In short, we will add stop, start, and reset features.
import SwiftUI

struct ContentView: View {
    @State var time:Int = 5
    @State var isCounterActive:Bool = false
    let timer = Timer.publish(every: 1, on: .main, in: .common).autoconnect()
    var body: some View {
        VStack {
            HStack{
                Image(systemName: "clock").resizable().frame(width: 40, height: 40)
                Text("Timer Application").bold().font(.largeTitle)
            }

            ZStack{
                Text("\(time)").bold().font(.largeTitle).onReceive(timer) {_ in
                    if time > 0 && isCounterActive{
                        time -= 1
                    }else{
                        isCounterActive = false
                    }
                }

                Circle().strokeBorder(lineWidth: 5).padding().foregroundColor(.green)
            }

            HStack{
                List{
                    ForEach(Array(stride(from: 0, to: 65, by: 5)), id: \.self) { index in
                        Button("\(index) Seconds"){
                            time = index
                            }
                    }.foregroundColor(.black)
                }
            }

            HStack{
                Button("Start"){
                    isCounterActive = true
                }

                Button("Stop"){
                    isCounterActive = false
                }

                Button("Reset"){
                    time = 0
                    isCounterActive = false
                }
            }
        }
    }
}

struct ContentView_Previews: PreviewProvider {
    static var previews: some View {
        ContentView()
    }
}
We now have a rough sketch of a functional timer and how to run elements before customizing them.
In this section, I added 3 additional buttons in code, the reset button sets the time variable to 0, and the other buttons “isCounterActive” variable to become active or inactive.
I also created a list that allows us to choose how many seconds the counter will run (not very useful, but we will update it.)
HStack{
   ZStack{
      Button("Start"){
         isCounterActive = true
      }.foregroundColor(.black)

      RoundedRectangle(cornerRadius: 25)
      .strokeBorder()
      .frame(width: 90, height: 55)
      .padding()
      .foregroundColor(.green)
   }

   ZStack{
      Button("Stop"){
         isCounterActive = false
      }.foregroundColor(.black)

      RoundedRectangle(cornerRadius: 25)
      .strokeBorder()
      .frame(width: 90, height: 55)
      .padding()
      .foregroundColor(.red)
   }

   ZStack{
      Button("Reset"){
         time = 0
         isCounterActive = false
      }.foregroundColor(.black)

      RoundedRectangle(cornerRadius: 25)
      .strokeBorder()
      .frame(width: 90, height: 55)
      .padding()
      .foregroundColor(.yellow)
   }
Now that we’ve adjusted the button appearances, our next task is to overhaul the functionality list.
data-ad-client=”ca-pub-1388441368753364″ data-ad-slot=”5765254308″>Step 5 – Adding Picker
In this section we will remove the list component and replace it with a selector, thus providing a simpler design for the user.
import SwiftUI

struct ContentView: View {
    @State var time:Int = 5
    @State var isCounterActive:Bool = false
    let timer = Timer.publish(every: 1, on: .main, in: .common).autoconnect()
    var body: some View {
        VStack {

            HStack{
                Image(systemName: "clock").resizable().frame(width: 40, height: 40)
                Text("Timer Application").bold().font(.largeTitle)
            }

            ZStack{
                Text("\(time)").bold().font(.system(size:100)).onReceive(timer) {_ in
                    if time > 0 && isCounterActive{
                        time -= 1
                    }else{
                        isCounterActive = false
                    }
                }

                Circle().strokeBorder(lineWidth: 5).padding().foregroundColor(.green)
            }

            HStack{
                ZStack{
                    Picker("Seconds:" , selection: $time){
                        ForEach(Array(stride(from: 0, to: 65, by: 5)), id: \.self) { index in
                            Button("\(index) Seconds"){
                                time = index
                            }
                        }
                    }.colorMultiply(.black)

                    RoundedRectangle(cornerRadius: 25).strokeBorder(lineWidth: 3).frame(width: 190, height: 70).padding().foregroundColor(.black)
                }
            }

            Spacer().frame(height: 50)

            HStack{
                ZStack{
                    Button("Start"){
                        isCounterActive = true
                    }.foregroundColor(.black)

                    RoundedRectangle(cornerRadius: 25).strokeBorder().frame(width: 90, height: 55).padding().foregroundColor(.green)
                }

                ZStack{
                    Button("Stop"){
                        isCounterActive = false
                    }.foregroundColor(.black)

                    RoundedRectangle(cornerRadius: 25).strokeBorder().frame(width: 90, height: 55).padding().foregroundColor(.red)
                }

                ZStack{
                    Button("Reset"){
                        time = 0
                        isCounterActive = false
                    }.foregroundColor(.black)

                    RoundedRectangle(cornerRadius: 25).strokeBorder().frame(width: 90, height: 55).padding().foregroundColor(.yellow)
                }
            }
        }
    }
}

struct ContentView_Previews: PreviewProvider {
    static var previews: some View {
        ContentView()
    }
}
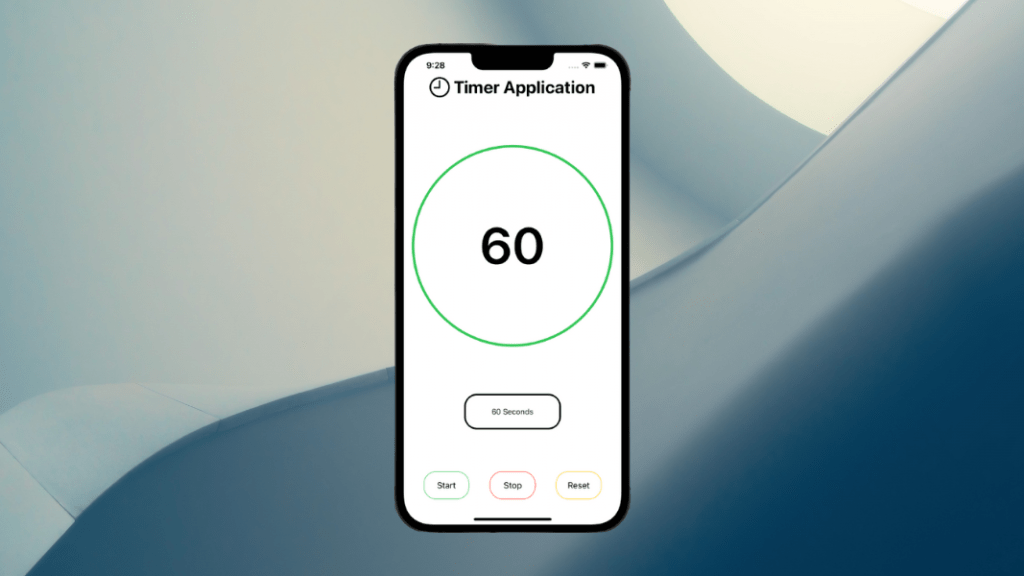
All done, we have created a simple seconds counter. Now let’s take a final look at the application.
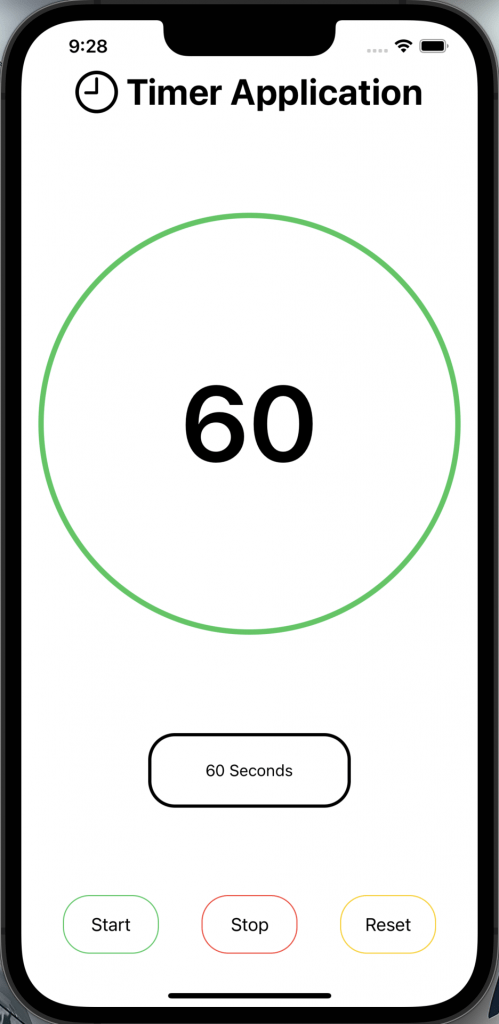
You can view all used files and codes from my Github account (here).