
Welcome to the first C# Tutorial, we’ll learn the basics of C# programming also we’ll explain programming and programming logic for preparation.
To this tutorial gonna separate 3 levels also we’ll separate these levels into 5 parts. So we going to examine 5 part in beginner level after that we’ll pass to intermidiate level.
In final part is the Advanced level, we’ll learn hard subject also we’ll use these subjects in the Unity projects for game development.
Subjects to Learn
- What is Programming?
- Set Up Programming Environment
- How To Use Dotnet On Console?
- Working In Visual Studio Code With C#
- Working In Rider With C#
- Algorithm And Pseudocode (Basic)
- First Project!
- Output And Input Concept
- Function Logic
- Final Summary
What is Programming?
programming is a method by which we can communicate with the computer to facilitate or automate our daily life.
Programming languages are a tool for programming we use to manage computers, but they are programming logic, not event programming language.
When you learn to program exactly 1 time, you can learn all other programming languages, so understand the logic instead of memorizing the codes, if necessary, you can look at the codes from Google, the important thing is what you want to do.
Set Up Programming Environment
First, we need to set up a working environment, choose a code editor, an IDE, then we will install C # Dotnet.
There are many paid, free IDE and code editors on the market, choose what you want and Rider and Visual Studio Code will be used in this tutorial.
Install the recommended version of dotnet and update it frequently. While working with Visual Studio Code, we will use dotnet, it will come readily when loading in Rider.
How To Use Dotnet On Console?
While installing dotnet, we have to use it on the console. In this lesson, we will see 3 important commands and over time we will look at other important commands.
Press the Windows + R shortcut and run your terminal by typing cmd (a different terminal will also be). We’ll use this environment for creating projects, running project,s and delete project operations.
dotnet new console --output ProjectNameYou can create a new project with the command above, your project will come with a ready-made template, we will not edit the code, let’s run the project with our next command.
dotnet run --project ProjectNameAfter completing your project, you should try to see your errors, this command will run your project.
rmdir ProjectFolderNameNotice that this command is not a dotnet command, but since it is used to delete folders, you can use it to delete your project.
Working In Visual Studio Code With C#
Visual Studio Code is an open-source hackable code editor, but when first loaded it comes completely hollow so let’s equip it with nice features.
It will be enough to install the C # support offered by Microsoft for now, you can increase your code writing speed by installing add-ons such as optional kite or tabnine.
Yes, let’s create a new project on Visual Studio Code and run our project. Visual Studio Code contains a terminal in itself, open the terminal from the bottom bar.
Then create and run a project using the project commands we learned earlier. Visual Studio Code creates a project for the file on which it is open, and runs it.
The Program.cs file is where all the code is written, I do not include classes and interfaces, we will see those topics later, for now, all the code will be here.
Working In Rider With C#
Since Rider is an IDE, its features are ready and you don’t need to write code for dotnet, let’s create a project and run it on Rider.
When Rider is opened for the first time, a window will greet you. Press New Solution and then select Console Application as a template. This is how your new project is ready.
We do not need to write a code in the same way to run our project. If you press the green arrowhead in the top bar, your project will work and we will look at other features.
If you cannot find the file in your project, you can find it from the Solution menu as if it was in a file editor.
We will use it to encode the Program.cs file is your code file. Open your file and use the top bar to run it.
Algorithm And Pseudocode (Basic)
Although there are 2 issues to be focused on in these two concepts, let’s simply summarize both of them and examine their differences.
Usually algorithms are more comprehensive, they are used before the project starts, they show all the steps the project will go through and make it easier to manage.
Pseudo-code, on the other hand, is mostly shortcodes and notes written as comment lines that we use to show us what to do when we start programming.
You can show algorithms in 2 types, symbolically or as text. The important thing that I will not go into their types and features is that algorithms and pseudo-code are used to manage the project.
1 - Start
2 - Open App
3 - Read Data On App
4 - Close App
5 - Write Data On Console
6 - Finish
The example above is an example of Algorithm. Now let’s examine a pseudo code.
string str = Console.ReadLine() // For Input
Console.WriteLine(str) // Write Input
As you can see, it is mostly written in code form, do not care about the codes here, we will see it soon.
First Project In C#!
Our first project will be the Hello World application, which is implemented by every programmer, based on screen printing.
If you have set up your project correctly, that project is now standing in front of you. It should look like the following.
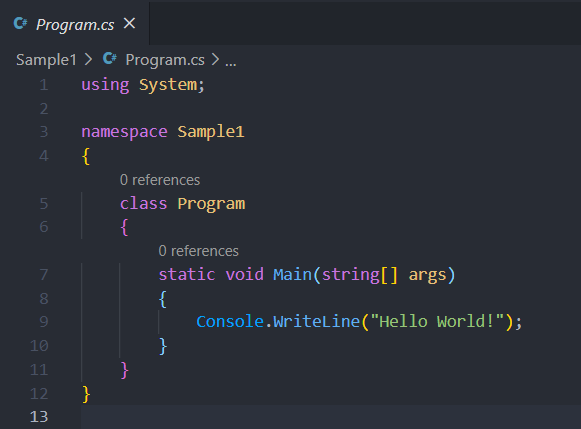
Forget all the codes except Console.WriteLine, the only thing we need to know is we write our codes into Static Void Main and we will learn what they all do in the following lessons.
We use the Console.WriteLine function to print a printout on the screen. We will explain exactly what we do in the Output and Input concepts section. Note that this function prints text on the screen for now.
output: Hello World!So what is this Console, and why is it separated by a period with the WriteLine function. Console is the main class, so think of it as an all-encompassing box for now. WriteLine function is right in this box.
Later, we will explore other functions in the Console box, and even make our own functions and boxes (Classes).
Output And Input Concept
We should learn these two concepts well, and I will use them frequently in other subjects. A program converts Input to Output.
Briefly, if you want a result, you must enter an entry that can be a number, a decimal number or even text.
The WriteLine function printed an Input to the screen and the Input we gave was a text. The WriteLine function converted that Input to Output and printed it on the screen.
To better understand the subject, let’s make the given Input a number and run the code again.
using System;

namespace Sample1
{
    class Program
    {
        static void Main(string[] args)
        {
            Console.WriteLine(123);
        }
    }
}
output: 123Yes, you must be wondering why we don’t use quotation marks, quotation marks are only used in strings, if 123 were enclosed in quotes, that number would not be 123.
To prove, let’s do an addition so we can tell the difference between string and int (integer). We also reinforce the information we have in mind.
using System;

namespace Sample1
{
    class Program
    {
        static void Main(string[] args)
        {
            Console.WriteLine("123" + "123");
            Console.WriteLine(123 + 123);
        }
    }
}
output:
123123
246
As you can see, it combined the two texts and printed 123123, but our other result turned out to be 246 because she added the two numbers.
Function Logic
We will continue to use the function concept frequently in the future, so let’s examine it now. Functions serve to call a command block with just one shortcode.
Functions can receive inputs (can also take), these inputs are entered by the user or pre-registered. These entries can be used with other commands.
Functions also convert inputs to Outputs. We will examine the functions more in the future. Currently, it can only be considered as a system that manages blocks of code and converts Input to Output.
Final Summary
In this lesson, we have finished the basic steps. In the second part, we will go into more coding jobs, we learned the techniques and other necessary information in this chapter