
In this article, we are going to learn essential Bash commands. This article contains all of the essential topics about Bash scripting.
We are going to start from zero, so you don’t need any knowledge about Bash even you don’t need knowledge about shell too. We are going to examine all of them.
What is Shell and Bash?
Briefly, a shell is a program that provides an interface between a user and an operating system kernel.
An operating system starts a shell for each user when the user logs in or opens a terminal or console window.
Operating systems have their own shells, in this case, the scripting languages of these shells also change.
Unix-like operating systems use Unix Shell as the shell, while Windows uses Powershell or CMD. In the macOS operating system, the shell comes as a Unix shell.
Scripting languages Bash for Unix, Powershell (its scripting language) for Windows are used. It used Bash until macOS 10.15 but later switched to Zsh.
What is Bash Script and How to Use?
The bash script is a text file containing a set of commands. They are written to finish a task, just like Python scripts.
Any commands that can be executed in the terminal, may be put in the Bash script. That, you can write the algorithms with the Bash script.
To make the bash script executable, a shebang (a string of characters specifying the path of its interpreter) is used.
You don’t need to add any extensions to the file, as the shebang defines which interpreter will run the file.
Today’s popular text editors offer features such as syntax highlight and autocomplete for the Bash script.
Introduction to Shebang
Shebang is a character sequence used in Unix-like operating systems to make the file executable. This character sequence is #! starts with.
A file containing a shebang is defined as a file to be interpreted on Unix-like systems. The shebang is written in the first line and is skipped by the interpreter.
When the file is run, the program loader runs the program located at the specified path. Then interpreter executes the file, this time the Shebang line is ignored.
Syntax of Shebang And Example Shebangs
The shebang line has special meaning only when used in the first line of the script. On a different line, the interpreter will see it as a comment.
#!interpreter The syntax is like this. As an example, let’s set the shebang to define the Bash interpreter after that, we are going to set for define the zsh interpreter.
#!/bin/bashWith the help of the above command, Bash can be defined for the interpreter. Now let’s define the zsh interpreter.
#!/bin/zshThe shebang doesn’t just allow you to define shell interpreters, it can be set in interpreters like Python or Perl.
#!/usr/bin/python3Creating and Executing Bash Script
You can create a bash script in the terminal after that you can open it with vim, vs code, sublime text, or another text editor.
$> touch fileWith help of the touch command, you can create a file in the current directory on the terminal. We are going to look again at this command.
$> vim fileThe above command opens the specified file in vim on the terminal. You should see an interface like the one below.
Vim is an open-source text editor available on almost all Unix-based operating systems.
Vim is a little different to use compared to other text editors, if you don’t know how to use vim for editing code, read this article.
#!/bin/bash

echo "This is Bash Script"
echo "This file allow second command"
echo "Bash scripts work as Python script"
This file will print 3 sentences to the terminal screen. We’ll come back to the echo command, for now, you just need to know that it writes to the screen.
$> chmod u+x file
$> ./file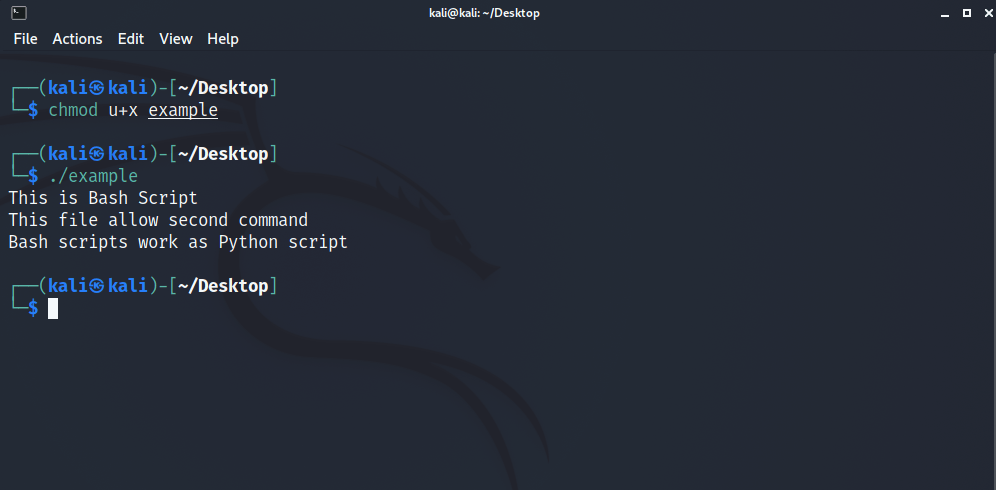
The chmod u+x command makes the script executable for the active user, then you can run this file directly with its name.
When your file is executed you have to see the text you write with the echo function on the shell.
File and Folder Commands in Bash
In this section, we are going to pass bash commands. We are going to learn how to manage files and folders in the terminal.
We will see the most important commands, such as creating a file, deleting its contents, creating a folder, changing a directory, creating a directory.
1 – pwd command
The pwd command stands for print working directory. It is prepared to print which directory you are in.
$> pwd
/home/kali

$> pwd
/home/kali/Desktop
In which directory you start the terminal, pwd will return that directory, we will see the benefits of pwd after we learn to change the directory in the other section.
2 – cd command
cd (change directory), you can change the directory without using file manager. it’s a command that changes your current directory to the specified directory.
$> pwd
/home/kali
$> cd Desktop
$> pwd
/home/kali/Desktop
When you changed the directory, you can check your current directory with the pwd command. Tips: All commands affect the current directory (if you didn’t specify).
You can use the cd command to open the folder. when you used the cd command for changing the directory actually, you opened this directory in the terminal.
$> cd simpleFolder
$> touch example.text
We are going to examine the details in the next section. the touch command is to create a file in the current directory.
Thanks to the commands above, we got into simpleFolder and we created an example.txt file in this folder.
When you need to exit a sequence, simply put two dots next to the cd command to return to the previous sequence.
$> pwd
/home/kali/Desktop

$> cd ..
/home/kali
3 – cat command
You can use the cat command for creating a new file, viewing the content of the file. Briefly, the cat command helps us to create, view, concatenate files.
Also, you can use this command to copy the content of the file and you can paste this content into another file.
$> cd Desktop
$> pwd
/home/kali/Desktop
$> cat > newFile.txt
We created a new text file on the desktop. You can edit the text in a simple text editor (vim or another program).
Contrary to the touch command, it does not create a file directly in the active directory, cat command allows editing file content, after creating.
$> vim newFile.txt
Change Saved
$> cat newFile.txt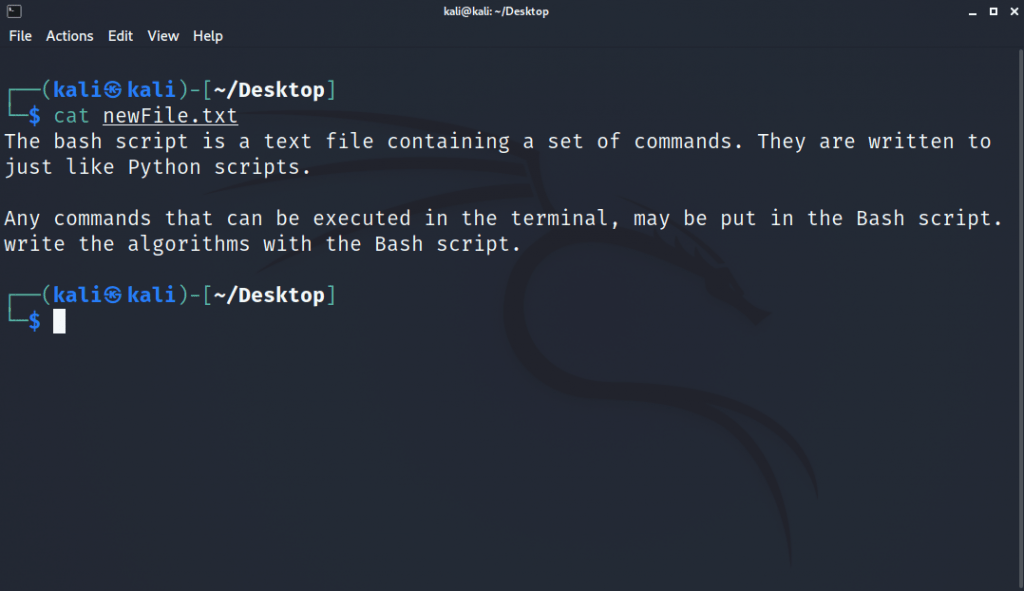
You can copy and paste this content into another file. Thus, you can change the file name and content with just 1 command.
$> cat current.txt > target.txtYour current text file content copy and paste into the target text file. Must be specified if current or target files are in different directories.
You can combine multiple texts with the cat (concatenate) command, and it is also possible to export these texts to a file.
$> touch combined
$> echo "Text1" > file1
$> echo "Text2" > file2
$> echo "Text3" > file3

$> cat file1 file2 file3 > combined
You can transfer the texts to a file with the echo command. A file is created with the string specified in the above method.
Then the cat command combines these 3 different text files into one file.
4 – mkdir command
mkdir (make directory) command create a new directory (folder). You can create multiple directories with the mkdir command.
$> mkdir newDirectory
$> mkdir {First,Second}
Parent directories can also be created with mkdir. You can create a directory and parents directory together.
$> mkdir -p new/new2/new35 – ls command
This command using for printing directories and files. We created directories and files, we can see these changes with the ls command.
$> ls
Desktop  Documents  Downloads  Music  Pictures  Public  Templates  Videos
ls commands print the list of files and directories. This command can be used for checking the environment.
6 – rm command
rm (remove) this command uses for removing files and directories. Simply if you type the rm keyword and enter your file name next to it, your file will be removed.
It is also possible to remove directories by using the rm keyword with the -rf parameter.
$> cat > example.txt
$> ls
example.txt

$> rm example.txt
$> ls
-Empty-

$> mkdir example
$> ls
example

$> rm -rf example
$> ls
-Empty-

$> clear
The clear command is used to clear the output on your terminal. It deletes all output.
7 – cp command
cp (copy) command allows copy file, it allows you to transfer the copied file back to another file.
The cp command takes 2 values, the first value is the file to be copied, the second value is the file to which the copied file will be transferred.
$> cat > example.txt
$> cp example.txt example2.txt

$> cat example.txt
Hello Bash

$> cat example2.txt
Hello Bash
A few chapters ago, we mentioned that everything in Linux is a file, which means that it is a file in commands.
With the help of cp, you can save a command whose naming you do not like as a file with another name.
$> sudo cp rm removeWe’ll cover the sudo keyword in more depth later, think of it as a keyword that gives you full authority for the moment.
Now you can use the file named remove instead of the rm file to remove something. All the content in rm has been transferred to the file named remove.
8 – touch command
The touch command is used to create files like the cat command. Preview does not occur when you create a file with the touch command.
In other words, you do not have the chance to enter content later as you create a file like a cat command, it just creates the file.
$> touch password.txtWhen you create a file with cat, if there is a file with the same name, it will overwrite this file, but touch does not remove the content of the old file by default.
9 – mv command
The mv (move) command is used to rename or move files or directories. Saves the specified file with a different name.
The obvious difference between the cp and the mv, the cp command keeps the record while the mv command deletes the old record and transfers it to another file.
$> touch pass.txt
$> ls
pass.txt

$> mv pass.txt password.txt
$> ls
password.txt
As in the example above, the old pass.txt file has been removed from the directory, if we had used cp the old file will also be available as the cp command copies the file.
If you use the mv command with the -i parameter, you can move the file to a different file and overwrite that file.
$> ls
x.txt y.txt

$> cat x.txt
Hi
$> cat y.txt
Hello

$> mv -i x.txt y.txt
mv: overwrite 'y.txt'? y
$> cat y.txt
Hi
It is very simple to use the mv command with directories, we can perform our operations simply by specifying the directories into the sections we specify the file.
10 – grep command
grep command is used for searching patterns in files or directories. Thanks to the grep command you can search text in files or files in directories.
grep command options are so essential for searching patterns. You can see these commands by using the “man” command.
Sample text file for using grep command. We created a simple text file for applying the grep command. You can change content and file name as your want.
$> grep "text" file.txt
Sample text file for using grep command.
Here we are searching “text” in file.txt, case matching is important here, only values that exactly match the given string are printed.
When you use it without any options, the grep command will print the sentence containing the matching word.
If you run the grep command with the -i option, you can search for the same words regardless of case matching.
$> grep -i "TEXT" file.txt
Sample text file for using grep command.
Helps of -i operator we printed sentence again. You can use the -c operator to print how many matches there are.
$> grep -c "text" file.txt
1
You can skip case matching by using -i along with the -c operator. Since -i is not used here, the searched pattern must be exactly the same.
To better understand these two commands, let’s modify our text file a bit and test it again.
The bash script is a text file containing a set of commands.
The Bash script is so cool!
$> grep "bash" file.txt
The bash script is a text file containing a set of commands.
$> grep -i "bash" file.txt
The bash script is a text file containing a set of commands.
The Bash script is so cool!
$> grep -c "bash" file.txt
1
$> grep -c -i "bash" file.txt
2With the grep command, we can search for a pattern in different files at the same time. The -l option is used for this.
It can be set to scan all files in a directory or search only the specified files. It saves you the trouble of searching each file one by one.
-- password file--
Alex: password
James: password2

-- username file--
Alex: Alex
James: James

-- secure code file--
Alex: x2x3x4
y2y3y4
In the above section, the content information of the 3 files to be scanned is given. The grep command will perform operations on these files.
$> ls
password.txt
username.txt
secureCode.txt

$> grep -l "James" *
username.txt password.txt

$> grep -l "James" password.txt secureCode.txt
password.txt
The * keyword means to select all files in this directory. Instead of checking them all, you can separate some files by entering the name one by one.
In the example here, we scan the username in the files, if any data is missing, the file is not returned and we locate the missing data.
$> cat file.txt
Hello, World!

$> grep -n "Hello" file.txt
1: Hello, World!
With the help of the -n parameter, you can find out from which line the captured sentence was brought.
You can view other grep parameters with the “man” command, we learned the most used parameters.
User Management Commands in Bash
You can easily edit users and system privileges with the Unix terminal. In this section, we will look at commands related to the users and system.
1 – adduser command
The adduser command allows you to create a new user. The adduser command prompts you to set different variables such as this user’s password and properties.
$> sudo adduser newYou need the highest authority for tasks such as adding a new user, adding access authorization to the user, changing the user’s information.
That’s why the command called sudo uses, this command meaning is superuser do. It is a user with access to everything in the system.
$> cat /etc/passwdUsers are stored in the /etc/passwd directory in Linux operating systems. You can see the newly created or existing users here.
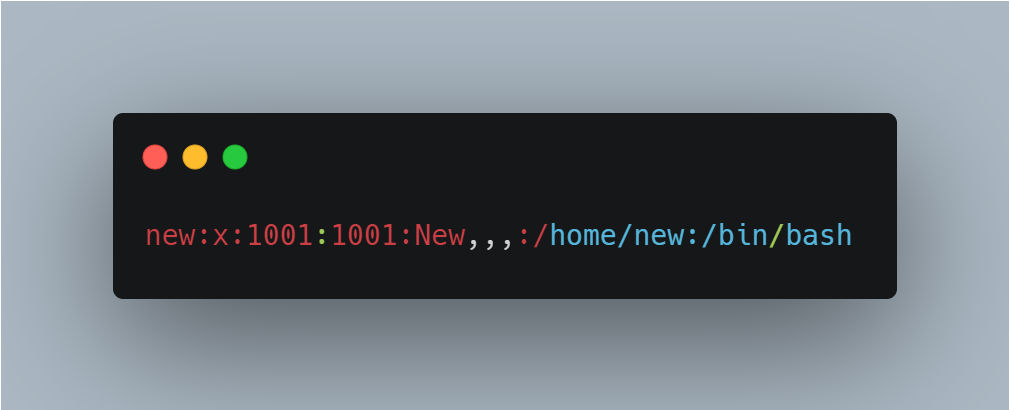
At the end of /etc/passwd, there should be information about the user you created. Line start starts with a username.
Then there are the UID and GID codes. immediately after them are the general name you gave and the home directory. At the end of the string is the default shell.
A simple schematic: username:x:UID:GID:fullName:home/directory:defaultShell. When you create a user, it is defined to the system in the same order.
$> sudo cat /etc/shadowYou can view the passwords of the users by switching to the directory named /etc/shadow. Passwords are in Hash format.
2 – useradd command
It can be thought of as an alternative to the adduser command. The useradd command creates a user directly.
It does not ask for information such as password, full name, root code, and does not create any home directory for the user.
$> sudo useradd simple
$> cd home
$> ls
kali / new
In this way, we can see that no space is reserved for the “simple” user in the home directory on my local computer.
$> sudo useradd -m kingYou can create a home directory, which is not created by default, using the -m parameter of useradd.
3 – passwd command
Thanks to this command, we can change the passwords of the users or add a new password if it does not exist.
$> sudo passwd simple
New Password:
Retype new password:
4 – usermod command
A command that allows you to edit all user-related values. You can change values such as user name, default shell with this command.
$> sudo usermod -l old newThe -l parameter tells usermod to change the username. When the above command runs, the user named new will be named old.
It is possible to change the name of the folder in the home directory with usermod, by using the -d parameter.
$> sudo usermod -d /home/x old -mAfter the home directory is changed, the home directory content can be moved to the new location with the -m parameter.
It is also possible to change the default shell with usermod. For example, the “simple” user shell is currently sh shell, let’s convert it to bash.
$> sudo usermod user --shell /bin/bash5 – userdel command
Simply, this command deletes the user. Yes, its only task is to delete this specified user.
$> sudo userdel user6 – su command
The su (switch user) command allows you to switch between users. As an example, let’s switch to any user we’ve already created.
$> sudo useradd james -m
$> sudo passwd james
$> su - james
7 – groups, groupadd, delgroup, visudo commands
Before moving on to commands, let’s learn a little about groups in Linux. Group is a collection of users.
The main purpose of the group is to share a feature with the users in that group. For example, the sudo group offers all privileges to the users in that group.
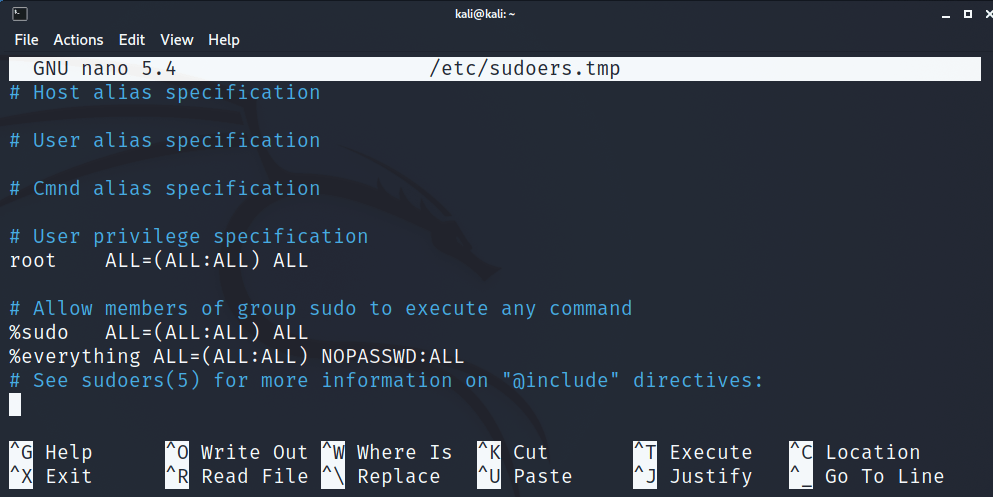
$> sudo visudo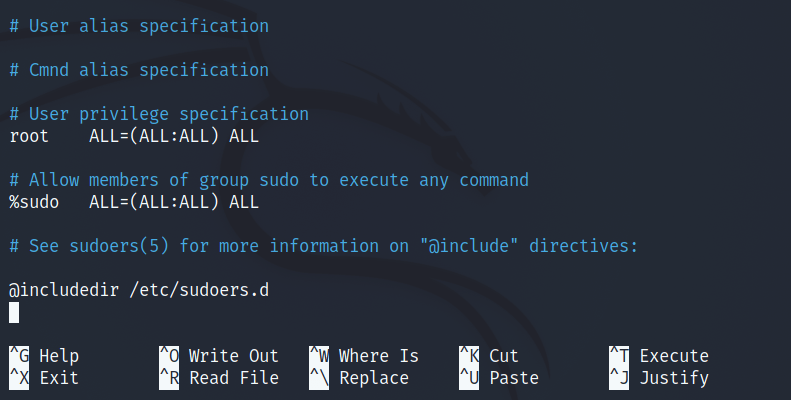
With the help of this command, you can see which user or group has been given access and what kind of access. Root user and sudo group access everything.
Now let’s create a group and give it access to everything just like sudo. So we can use that group instead of sudo.
$> sudo cat /etc/groupYou can find a list of all groups created in this file. Thus, it will not be possible for any group to escape your notice.
$> sudo groupadd everythingYou can also find the newly created everything group in the /etc/group directory, now let’s give this group all privileges.
$> sudo visudoWe will open sudo visudo and give all access to the group everything and also prevent it from asking for the password.
In short, this group can do everything freely without even the need for a password.
Okay, now we have created the “everything” group and given the necessary permissions, now we need members to use these permissions.
The usermod command comes to our aid again. We can add a user to a group with the -aG parameter of usermod.
$> usermod -aG everything jamesThe user named James is now a member of the everything group and has access to everything. You can switch to James user with the su command for testing.
Well, this much access may seem terrible to you now. Fortunately, we have the groupdel command, we can delete a group with this command.
$> sudo groupdel everythingDon’t forget to edit the visudo file and now the group named everything is deleted. James will no longer appear as a member of that group.
Package Management Commands in Bash
In UNIX operating systems, packages are usually set up in the terminal. In this section, we are going to learn package management commands.
In Linux distributions, a “package” refers to a compressed file archive containing all the files that come with a given application.
If it sounds confusing, let’s simplify it a bit, packages in Linux are volumes that store your applications or multiple files. It’s like .zip file.
1 – dpkg command
dpkg can be thought of as software that opens a Debian package. Bash installs the package you specified on your computer when dpkg is called.
For example, I want to install Visual Studio Code software on my Linux system, when I go to the main page and click download, a Debian file installed on my computer.
I need the dpkg command to install the files included in the deb package to my computer (like extracting the files inside the zip file).
$> cd Documents
$> ls
code_1.64.2-1644445741_amd64.deb

$> sudo dpkg -i code_1.64.2-1644445741_amd64.deb
With the dpkg command, applications can be installed in this way, but it has many weaknesses.
For example, if we needed different files (usually needed) while installing vscode, we would have to install them one by one.
Another big disadvantage is having to install the .deb package first with the browser and it’s very slow.
2 – apt intall command
We can use apt (advanced package tool) to eliminate these disadvantages. The apt command works in just terminal we don’t need another thing.
You can easily download an application with the apt command. In addition, when different packages are needed to will be install packages, it automatically installs.
$> sudo apt install codeWith the help of the command, instead of downloading the package from the web browser and extracting it again, it is directly installed on the system.
Apt works as follows, it finds the application repository you specified and installs it like the git command.
3 – apt update and apt upgrade command
It can not only download files but also can delete, update, fix them. Thus, you can manage all software with apt.
$> sudo apt updateapt update updates the list of available packages and their versions, but it does not install or upgrade any packages.
The command that updates the packages according to the updated list is the apt upgrade command. These two commands are used together.
$> sudo apt upgradeThat’s it, all software has been updated to the latest version. Now, we are going to delete some repositories in the system.
4 – apt remove command
It is very easy to clean a package from the system with the Advanced Package Tool, run the command, and the specified file will be removed automatically.
$> sudo apt remove codeVisual Studio Code software was easily removed thanks to the above code. It can be checked for existence from the installed package list.
$> sudo apt list --installedInstead of showing all packages, it will only show packages that have been installed. For a more detailed search, grep can be used.
5 – aptitude command
aptitude is a text-based interface to the Debian GNU/Linux package system. It is suitable for those who want a visual-based package manager.
$> sudo aptitudeIt allows the user to view the list of packages and perform package management tasks such as installing, upgrading, and removing packages.
6 – pip3 command
Those who are good with Python know exactly what this command does. It can be thought of as a Python-specific git command.
A package manager for installing libraries or APIs for Python. It is also very simple to use.
$> pip3 install selenium$> pip3 install --upgrade selenium$> pip3 uninstall seleniumThat’s how easy it is to install, delete, update tools to use in python. All of them are automatically applied to the system.
$> pip3 install -r file.txtWith the -r parameter you can install all the required files found in a requirements.txt. In short, it is used to install more than one library.
Conclusion
We have finished package management, file and directory management, user and system management in Unix systems.
We finished this article. We learned essential commands in Bash. The information here will be sufficient for beginners.
I will prepare the 2nd part of this article, when it is active, I will leave a link here, stay tuned so you don’t miss it.